
These gluten free cheese breadsticks taste cheesier than the usual recipes because they are rolled in cheese, with only a little cheese inside. I have found that even if I quadruple the amount of cheese inside, you still do not taste as much cheese compared to these. This particular recipe can be twisted which makes for a more elegant presentation. Similar to pizza crust, they are crunchy on the outside and doughy on the inside. You may bake them for a shorter time if you wish your gluten free cheese breadsticks softer. Since my husband approves, and he eats gluten, he’s the best to judge. He loved this recipe the best. He dipped them in pizza sauce as an appetizer. I’m sure Super Bowl Sunday he’ll be asking for this gluten free recipe. Enjoy! My hubby sure did!
[showmyads]

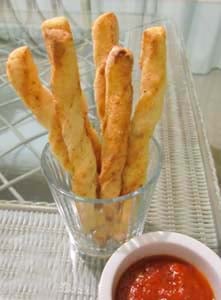
These gluten free breadsticks are such a treat with an Italian dinner or any for that matter. Add a pizza sauce for dipping!
Ingredients:
- 1/4 cup gluten-free Parmesan and Romano cheese*, grated
- 1/3 cup Mozzarella cheese, grated from frozen cheese (or your favorite cheese*)
- 2 teaspoons fresh rosemary leaves, minced
- 3/4 teaspoon garlic powder
- 1 recipe Gluten Free Biscuits**, refrigerated
- Gluten-free olive oil spray
Instructions:
- Preheat the oven to 500°F.
- Line 2 baking sheets with parchment paper.
- Ensure your grated cheese remains cold. Refrigerate after grating. In a small bowl, mix the garlic powder, rosemary and grated cheese.
- Prepare biscuit recipe (I used non-fat milk with 1 additional tablespoon of rice milk), adding half of the cheese mixture to the dry ingredients.
- Dust your hands with rice flour. Place the dough onto a lightly floured baking mat. Pat the dough into a rectangular shape, and then roll it out to about 1/2-inch thick and about 8" x 15". You do not want to overly flour your rolling surface or you will see the flour on your breadsticks.
- Cut into about 5/8-inch wide strips using a long knife or a pizza cutter.
- Sprinkle the other half of the cheese mixture on a plate or a flat surface such as a pastry rolling mat.
- Place each strip, one at the time, in the cheese. You will notice that the areas that were cut are moist enough to pick up the cheese mixture. Tap each side into the cheese, pressing lightly to coat each side of the strip.
- While transferring the strip to the lined baking sheet, begin to twist the middle of the strip; lay it down on the baking sheet and twist the ends.
- Spray the tops of the breadsticks with olive oil.
- Place in the oven and bake until your gluten free breadsticks are golden brown, about 10 to 12 minutes.
- Serve immediately. Reheat any left overs in a microwave on low for a very short time, though a microwave will soften them, similar to fresh baked pizza dough. If you overheat them they will begin to bend. Another option is rewarm them in the oven or a toaster oven.
Tips
In the comments section below from a Facebook fan she states you can make this recipe dairy-free and vegan by using the following ingredients, and it will taste like true pizza dough sticks:
*Galaxy Rice Cheese, grated **So Delicious brand plain coconut yogurt
Like this recipe or haven’t found what you’re looking for? Search for all of the Gluten Free Recipes through our index.
Facebook Comment on Sept. 10, 2010:
“OMG! I just made these! I could cry they are so good:) they came out crunchy on the outside like a loaf of French bread. I wonder if I could use this as a pizza crust. It tastes just like it. I will definitely make this again. I even changed it and made it with rice vegan cheese and coconut yogurt and it is still indistinguishable to me from an ordinary breadstick:)))
“I used the Galaxy brand Rice Vegan and I shredded the block of “cheese” in my salad shooter with the grater blade. I also used the So Delicious brand plain coconut yogurt:) Such an easy recipe too.”
~S.C.