
I was so pleased with these gluten free truffles, as this was my first time coating them in tempered chocolate. Tempering the chocolate, discussed below, will give your truffles a professional shine. Tempering chocolate seems much faster than it appears in the directions below. It really is a chore. Unless these are a gift, I would skip that step and just melt the chocolate and not let it cool too much before dipping. Truffles are very easy and fast to make unless you are dipping them in chocolate. But it was so well worth it, as these were a gift. You may decorate the tops with white chocolate mixed with food coloring (Select Tea makes natural ones), or you may drizzle a bit of thin chocolate on the top after it sets a bit, or leave plain, as I did. I thought the papers that I used were decoration enough. If they are for Valentine’s Day you may think about piping out a very think pink or red heart. How will you decorate your gluten free truffles?
[showmyads]

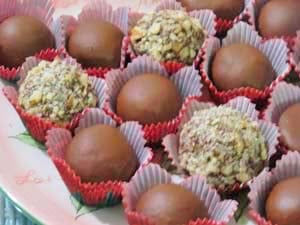
A decadent gluten free truffles recipe coated with your choice of chocolate, cocoa, cinnamon, powdered sugar or nuts.
Ingredients:
- 1/2 cup heavy whipping cream
- 1 1/2 cup gluten-free dark or semi-sweet chocolate morsels (1 3/4 cup milk choc.)(Nestle's)
- 1 teaspoon pure vanilla extract
- Melted chocolate of your choosing, chopped (one you normally would eat plain)
- High quality pure cocoa powder (Grocery store brands taste bitter.)
- Cinnamon
- Powdered sugar
- Nuts, finely chopped (I used walnuts.)
- Chocolate, (4 king size Hershey bars) or a higher quality chocolate
Instructions:
- Heat whipping cream in a small sauce pan, just prior to boiling.
- Add chocolate morsels to a bowl and pour vanilla on top; mix until coated.
- Pour heated whipping cream on top of the chocolate in the bowl; allow to sit for about 2 minutes; place bowl on top of burner on low; stir until creamy, up to 5 minutes. Real chocolate melts faster than morsels and may not need to be returned to the burner.
- Set aside to cool for about 15 minutes or until thickened.
- Refrigerate for about 40 minutes. Start checking after 30 or 35 minutes. You do not want to allow it to harden completely. If you do, just leave it out until it warms a bit and stir.
- Use this time to prepare your coatings, other than chocolate coating.
- Scoop the balls out into the size you prefer (1 - 2 tablespoons - 1 tablespoon fits nicely in miniature candy papers; 2 tablespoons or more fits nicely in miniature cup cake paper); roll into balls and refrigerate if dipping in melted chocolate.
- To Melt the Chocolate:
- Add chopped chocolate to a heat-proof bowl over a pan of simmering water (not touching bowl). Allow to melt and then stir.
- Using a fork, dip ganache balls into melted chocolate.
- Transfer to a parchment-lined baking sheet. (Do not use silicone baking mats. The truffles just slide around.)
- Transfer to refrigerate until you can touch them without leaving a fingerprint on them, about 30 - 60 minutes.
- Otherwise, roll into a plate of cinnamon, cocoa powder, confectioners' sugar or finely chopped nuts (walnuts or pecans).
Tips
If you desire shiny chocolate it calls for tempering the chocolate. See instructions on how to temper chocolate at http://allrecipes.com/howto/tempering-chocolate/
It’s way faster to put the ganache in a pastry bag before the refrigerator stage, and pipe them directly in to the candy cups. Dust with cocoa or ? and refrigerate. My sis and I started making these years ago and found that during all the steps we didn’t have many left when we were done ;)
sounds simple and amazing. I’ll try it for Christmas!