
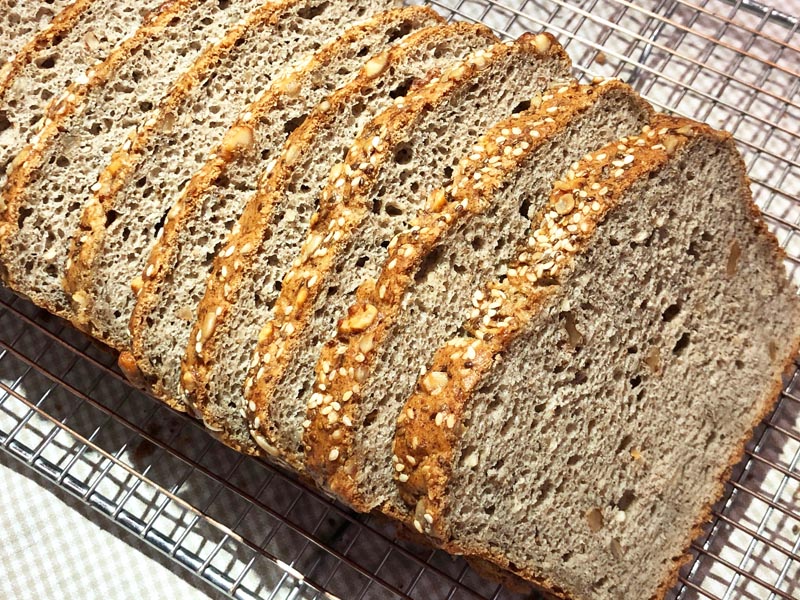
If you’re tired of gummy, chewy, homemade gluten free bread without flavor, you’ll love this gluten free buttermilk seed bread. Loaded with seeds and nuts, this bread has a slightly sour flavor, similar to sourdough, without added time or effort. The seeds and nuts add flavor as well as great texture. The healthy flours like buckwheat, sorghum, and almond make it perfect!
Months ago, my friends over at Brod & Taylor sent me their Folding Proofer/Slow Cooker. I used it to make this gluten free buttermilk seed bread. I adapted the recipe from their gluten version, Buttermilk Seed Bread. Loaded with nuts, seeds, and flavor with a crunchy or soft crust and doughy center, this bread will be enjoyed even by your gluten-eating friends and family.
Why Does This Recipe Work?
Years ago, I made a recipe using buttermilk, but it was a bit heavy. When I read the Brod & Taylor gluten recipe for this bread, I realized that the temperature of 400°F would dry out the inner dough more. While I knew the crust would turn out crunchy, I also knew that could easily be fixed after it’s baked (see instructions for details).
It has the perfect amount of buttermilk for the ingredients. Adding a little water instead of more buttermilk prevents that heavy and gummy texture, while still adding moisture.
The honey creates a softer texture versus the use of sugar and also aids in browning.
The small amount of almond flour provides a little moisture with its low amount of oil as well as flavor. in add, its texture prevents gumminess.
Using only 1 tablespoon of oil is perfect because adding the traditional 1/4 cup would create a gummy texture and make the bread heavy.
Less yeast is required in this recipe due to the buttermilk. Buttermilk provides its own yeast. Gluten free flours in bread dough usually struggle to rise. So, we usually add vinegar, baking powder, additional yeast, and more to help it along. However, this bread needs little help due to the buttermilk.
The buttermilk softens those whole grain flours and the flours really soak up all of that moisture, creating a wonderful, balanced texture.
Salt retards the rising of dough since it controls the action of the yeast. Because we’re using buttermilk, feel free to increase the salt a bit, if desired. I usually stick to 1 teaspoon, but 1-/14 worked just fine. I would even use 1-1/2 teaspoons and allow it additional time to rise, if needed.
Only 1 egg yolk is added to this dough to ensure it doesn’t crumble. Egg yolks create a crumb texture that tends to dry out easier as well.
Finally, if you have a pizza stone, baking on top of a preheated stone creates a hotter surface for the dough to quickly rise, maintaining that heat throughout the baking cycle creating a lighter loaf.
Gluten Free Buttermilk Seed Bread
Ingredients
- 2 tablespoons walnuts finely chopped
- 2 tablespoons sunflower seeds
- 1 tablespoon chia seeds
- 1 tablespoon sesame seeds
- 1-1/4 cups 1% fat buttermilk cold (or 2%)
- 1/4 cup water
- 2-1/2 tablespoons honey
- 1-1/2 teaspoons instant yeast
- 1 cup potato starch Bob’s Red Mill
- 3/4 cup corn starch Bob’s Red Mill
- 1/2 cup + 3 tablespoons buckwheat flour
- 1/2 cup + 3 tablespoons sweet sorghum flour Bob’s Red Mill
- 1/4 cup superfine blanched almond flour Kirkland
- 1 tablespoon xanthan gum
- 1-1/4 teaspoons salt
- 2 large egg whites at room temperature
- 1 large egg at room temperature
- 1 tablespoon oil plus more for oiling pan
- 2 teaspoons butter melted, for basting top crust, for softer crust (optional) (or dairy-free margarine)
- Seeds and nuts untoasted, for garnish (optional) (1-1/2 tsp. sunflower seeds, 1 teaspoon sesame seeds, 3/4 teaspoon chia seeds, and 1 tablespoon finely chopped walnuts)
Instructions
-
Add all of the seeds and nuts you’re using for the dough to a large skillet. Turn the heat to medium-high and toast 4 – 5 minutes, stirring often to prevent burning. Transfer the seeds to bowl to cool.
-
Heat the buttermilk, water, and honey to 110°F. Add the yeast, stir, and set aside until bubbly on top, about 10 minutes.
-
If using, preheat the bread proofer to 84°F, with a tray of water at the bottom, below the rack, with the lid closed.
-
Combine the dry ingredients: flours, starches, gum, and salt; set aside.
-
Beat the eggs and oil in the bowl of your stand mixer, fitted with the balloon/whisk attachment, for a short time. Pour in the buttermilk-yeast mixture and beat on low to combine.
-
Add the dry mixture and beat on medium speed still using the balloon attachment.
-
Liberally oil a 9 x 5-inch metal loaf pan; scoop the dough into the pan and level the top as best you can. Sprinkle some water on the top of the dough and smooth as best you can. Sprinkle the top with the nuts and seeds, if using. Wet your fingers and the back of your knuckles. Using the back of your fingers, tap the seeds into the dough.
-
Place the pan in the proofer or another warm environment and allow the dough to rise until it reaches about 1-inch above the rim of the pan, measuring from the center of the dough, about 30 – 40 minutes.
-
If using, place a pizza stone on a rack in the lower third portion of the oven. If not, place a rack in the center of the oven. Preheat the oven to 400°F for at least 20 minutes.
-
Once the dough completely rises, bake 20 minutes, turn the pan around for even browning, and bake an additional 20 minutes.
-
Transfer the pan to a wire rack to cool, in the pan, for about 20 minutes, but first, baste the top with melted butter if you prefer a soft, tender crust. The steam that develops in the pan will soften the side and bottom crust a little. If you prefer a crunchy crust, immediately remove the bread from the pan and transfer to the wire rack to cool completely. For softer crust, wait the 20 minutes before transferring.
-
Slice once the bread is completely cool, for about 90 minutes.
Tips
Egg-Free:
Use 2 tablespoons bean liquid from a can of white beans (like cannellini) to replace each large egg white and 1 tablespoon butter or other fat like coconut oil (refined for flavor-free) to replace each large egg yolk.
Dairy-Free:
See the Substitutions page for dairy-free substitutions including dairy-free buttermilk.
This is a really good loaf of bread. I used two whole eggs instead of two egg whites and one yolk. Mine was done in 30 minutes at 375 deg. (Maybe my oven runs high?) Will definitely make again.
Carla, I can’t eat buckwheat flour. Is there another flour I can substitute it with?
Carla, I remember making this bread! It was so good. I need to get some buckwheat flour so I can make it again.
Cindy P
I am confused about the recipe. In the story leading up to the recipe it says that only one egg yolk is used etc. But the recipe itself does not call for an egg yolk. can you clarify for me. Maybe I missed something.
Lori,
The one large egg contains an egg yolk. I hope that clarifies things for you.
Carla
This recipe looks good for me – except the chia. Would it still work to leave it out?
Veronica,
If you can use flaxseeds, use that. If not, leave it out.
Carla
Carla, this bread was a win ! Probably one of the best I’ve ever made. In 25 years of GF baking. I did use almond milk with vinegar instead of buttermilk an pecans and sprouted sunflower seeds on top. Also I did not add the oil because I thought it was for greasing the pan?. It took a longer time to rise, but all was well after baking. Thanks for all the recipes you have tested so well. I am madly trying to print out as many as I can….
Cindy,
Glad you enjoyed this bread. I’ll have to give this recipe a try without the oil and see which one we enjoy more.
Were you a lifetime member? If so, I have a different solution for you instead of printing the recipes. However, hard copies are always the safest solution.
I’m madly trying to create the so many recipes and cooking lessons that I can before my retirement. I only have one more month to go. Then, I’ll probably spend another month just copying and pasting my recipes into Word documents.
I’ll miss you, here, but let’s stay in touch or Facebook or Instagram.
Carla