
In an effort to show baking class students how to bake using eggs, a gluten free lemon meringue pie recipe was a must. Instead of using the starch-free recipe for lemon curd filling, I developed this richer recipe. It is irresistible. You have four pie crust recipes from which to choose as well as two fillings. The meringue is nice and sturdy. Be sure to watch the four instructional videos too.
I never used to be a fan of pies, especially lemon meringue. However, I love this pie. I’ve learned that the right crust for the right person (everyone has different ideas of what is a good pie crust) and a delicious filling is the way to win over hearts. You may like a crust sturdy, flaky, tender, (this one is all three), or really tender and flaky. What’s your favorite? See the popular options below. I think the sturdy pie crust is a bit too sturdy for lemon meringue pie, but perfect for runny fillings like berry or even apple pie. However, make what you enjoy!
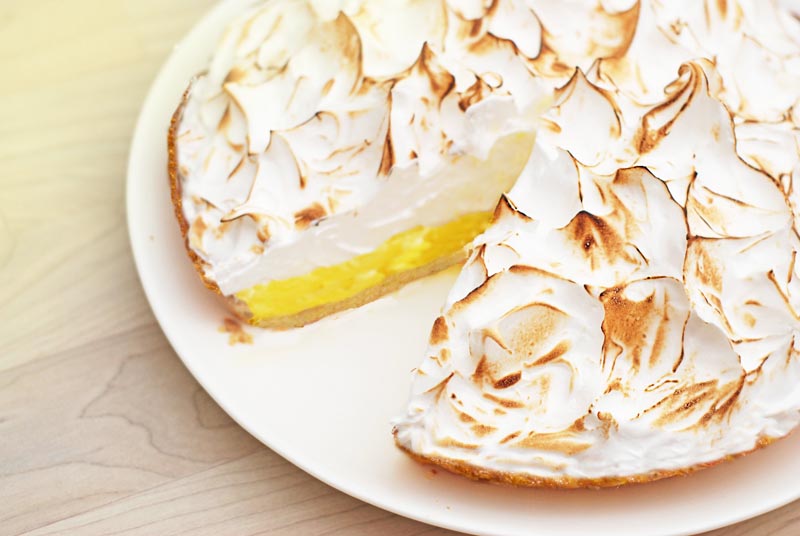
While I used the Tender & Flaky Pie Crust Recipe for the 9-inch pie that you see pictured above, I used the Cream Cheese Pie Crust recipe for the 5-inch and bite-sized pies you see pictured below:

Learn how to scallop the edges of the crust as you see in the above photo by watching the video on How to Scallop Pie Crust Edges.
Gluten Free Lemon Meringue Pie
Ingredients
For the Pie Crust Choices:
- 1 recipe Gluten Free Tender & Flaky Pie Crust as pictured above in the 9-inch pie (or)
- 1 recipe Tender Gluten Free Cream Cheese Pie Crust as pictured in the 5-inch crust photo (or)
- 1/2 recipe Very Tender and Flaky Gluten Free Pie Crust (or)
- 1/2 recipe Sturdy Gluten Free Pie Crust
For the Lemon Curd:
- 6 tablespoons unsalted butter cut into 24 pieces and frozen
- 8 large egg yolks (or 4*) (save 3 whites for the meringue)
- 1-1/3 cups granulated sugar
- 1/3 cup cornstarch
- 1/2 teaspoon salt
- 1-1/2 cups water
- 1 tablespoon finely grated lemon zest
- 1/2 cup fresh lemon juice
For a Thicker Curd:
- 2 tablespoons room temperature water optional
- 2 tablespoons boiling water optional
For Brighter Yellow Color:
- 1/4 teaspoon turmeric optional
- 1/4 teaspoon cornstarch optional
- 1 teaspoon water optional
For the Meringue:
- 3 large egg whites
- 1/4 teaspoon clear gluten-free vanilla extract LorAnn Oils (or pure vanilla)
- 1/8 teaspoon cream of tartar
- 1/16 teaspoon salt (small pinch)
- 3/4 cup granulated sugar divided
- 2 tablespoons water
- 1 teaspoon fresh lemon juice
Instructions
To Make the Crust:
-
Using a 9-inch round x 1-1/4 or 1-1/2-inch deep pie dish, make the pie crust as instructed at the above link (or linked in the above paragraphs). To learn how to scallop the edges of the crust, view the How to Easily Scallop Pie Crust Edges Video. Parbake/blind-bake the crust at 425ºF for 15-20 minutes depending upon the crust you are making. (After parbaking, use an egg wash made of egg yolk and heavy cream.) Then continue to bake. If you're just parbaking 15 minutes, you may add the egg wash prior to any baking. Once baked, set on a wire rack to cool.
To Make the Lemon Curd:
-
To make the filling, you may use a double boiler or make your own. To make your own, find a glass bowl that will fit in a saucepan over boiling water without touching the water. This is called a bain-marie. Heat enough water to prevent touching the bowl once it begins to boil.
-
In a cold bowl that you will use in the bain-marie or in the cold bowl of your double boiler, whisk together 1-1/3 cups sugar, cornstarch, and salt. Stir in the water and heat over the boiling water until all of the sugar melts and the mixture is extremely hot/scalding.
-
Add the lemon juice and zest and simmer for 10 minutes.
-
Remove the cornstarch mixture from the heat and strain into another saucepan over medium heat.
-
Whisk together the egg yolk in a bowl that holds about 2 cups. Slowly add about one-third of the lemon mixture to the egg yolks, while constantly whisking. Slowly pour the egg yolk mixture back into the saucepan, while constantly whisking. Continue to simmer over medium-high heat while constantly stirring until very thick.
-
Remove from the heat and stir in the frozen pieces of butter.
-
If you would like to create a deeper, richer yellow color, stir together 1/4 teaspoon turmeric, 1/4 teaspoon cornstarch, and 1 teaspoon water. Whisk in a little at a time to the lemon curd until it reaches your desired color. Continue to cook over medium heat while adding this mixture. (See the video on How to Naturally Color Lemon Curd.)
-
Place the curd in a bowl of ice and water. (Be careful not to get any water in the lemon curd. As the ice melts, it is easy for the bowl of curd to sink into the ice bath.) Stir occasionally until cool. Then, refrigerate until firm and cold, about 30 minutes.
-
Once cool, pour into the crust, cover with plastic wrap directly on top of the lemon curd, and refrigerate overnight.
-
If you do not wish the filling to be thin when at room temperature, mix in water and unflavored gelatin. To do so, add 1 teaspoon gelatin to 2 tablespoons room temperature water, stir, and allow to rest for 1 minute. Add 2 tablespoons boiling water, stir; set aside to cool. Then, stir the gelatin mixture into the lemon curd.
To Make the Meringue:
-
In the bowl of your electric mixer, beat the 3 egg whites, vanilla, cream of tartar, and salt on high speed until soft peaks form.
-
With the mixer on medium speed, slowly add 1/4 cup sugar until the peaks become stiff and glossy; set aside.
-
In a small saucepan over medium heat, bring the remaining 1/2 cup sugar, 2 tablespoons water, and lemon juice to a boil. Do not stir. Once the mixture reaches 245ºF, remove it from the heat and stir until the sugar dissolves. If any sugar granules get on the sides of the saucepan, brush them downward using a pastry brush dipped in water. (Sugar granules sometimes crystallize and ruin the syrup.)
-
Turn the mixer to medium speed and drizzle in the sugar-syrup about 1-1/2-inches away from the sides of the bowl. Continue to beat for about 6 minutes or until the bowl cools down. (Stainless steel bowls take about 6 minutes. However, a glass bowl may take less time.) Watch this video on The Consistency of Sturdy Meringue.
-
Transfer the meringue to a pastry bag or decorating device fitted with a small star tip. (Even a gallon-sized Ziploc bag with the tip cut open and filled with the tip will work.) Remove the sheet of plastic from the surface of the pie, if using, and pipe meringue directly on top of the filling. (You can get fancy using the star tip or simply add spoonfuls here and there. In either case, you can also use the back of a spoon and quickly withdraw to create peaks.)
-
If desired, using a kitchen torch, brown the top of the meringue. See the How to Torch Meringue Video.
-
Refrigerate until ready to serve. (This keeps the filling firmer.)
Tips
- The filling may be made 2 days in advance. Just cover with plastic wrap and refrigerate once it reaches room temperature.
- Using one-fourth of the filling makes a 5-inch pie plus 2 bite-sized pies.
- For a sturdier filling, replace 4 egg yolks with additional butter.
*For a lower fat version, you may reduce the egg yolks to 4.