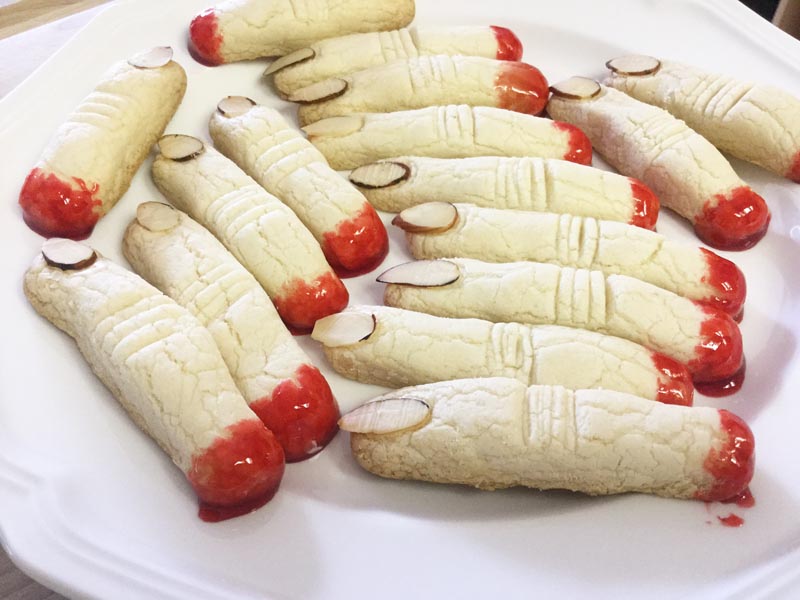
Don’t waste your time making dry gluten free Halloween cookies that only look good. Instead, make this delicious gluten free severed finger cookies recipe. They are between sugar and shortbread cookies. So yummy, yet gory! Every adult I shared these cookies with loved the way they looked and tasted! One gluten-eating person who hadn’t even tasted them (but is familiar with my recipes) offered to pay me to bake and ship some for her. I can’t charge my sister, right? (smile)

Make this Halloween fun by baking up some of these gory gluten free severed finger cookies.
Ingredients:
- 1 cup Gluten Free All-Purpose Flour Blend Recipe
- 1/4 teaspoon gluten-free baking powder (Rumford's or Featherweight for corn-free)
- 1/16 teaspoon salt
- 5 tablespoons unsalted butter
- 1/2 cup granulated sugar
- 2 tablespoons beaten egg (1/2 large egg)
- 1/2 teaspoon pure/gluten free vanilla extract (or 1/2 almond extract)
- 17 large almonds slices
- 1/4 cup red gluten free jelly or jam
- Gluten free food coloring (if not using raspberry jam) (Selectee Natural Cherry Red, McCormick Red, or AmeriColor gel Super Red)
Instructions:
- Preheat the oven to 325ºF. Line a baking sheet with parchment paper or a silicone baking mat; set aside.
- Whisk together flour, baking powder, and salt; set aside.
- Add the butter and sugar to the bowl of your mixer fitted with the paddle attachment; beat until creamy, about 2 minutes.
- Add egg and vanilla and beat until combined, scraping bowl at least once.
- Add half of the flour mixture; beat until combined; add the remaining flour mixture and beat again until combined. Test the dough to ensure it does not stick to your fingers. If it does, add a heaping 1/2 teaspoon of flour blend and beat again. Test again and add additional flour, if needed.
- Scoop out one tablespoon of dough and roll it into a finger approximately the length of your own fingers. I'm only 5'2" tall but the dough should be rolled a bit longer than my fingers. Place them on the prepared baking sheet.
- Add an almond slice to the tip of each one for fingernails. Shape the dough to represent fingers by squeezing the sides at and below the nail to make them a bit narrow in that area. Place your finger near them and try and duplicate it. Then slice 1/8 to 1/4-inch deep lines at the knuckle and if you'd like elsewhere such as just below the nail.
- Bake them on the center shelf with the timer set for 3 - 4 minutes. If they look like they are too wide, remove them from the oven and using the back of two serving spoons, make them more narrow by squeezing them into thinner fingers. Then continue to bake for approximately 13 additional minutes.
- Allow them to cool on the baking sheet for 4 minutes. Then transfer them to a wire rack to cool completely, 20 - 30 minutes.
- While the cookies cool, either microwave the jam or warm in a small saucepan. (I didn't have any raspberry jam. So, I added gluten-free food coloring to some pomegranate jelly.
- Dip the ends of each cookie into the red jam/jelly and transfer to a sheet of parchment paper or silicone baking mat. Once they set, transfer them to a serving platter.


These turned out great. I was worried they would be crumbly but they aren’t. I didn’t want to add ‘blood’ so I dyed the cookies green. I wanted to add a picture but couldn’t figure that out.
I had to add additional flour and I’d halves or omit the baking powder next time because they puffed up quite a bit, but these turned out great overall! I used coconut sugar ground finely in a food processor, made the indentations with a marcona almond and added the jam to the “nail bed” and “cut” end before baking. I found it helpful to refrigerate the prepped cookies for about 10 minutes before baking and bake them again on a cooling rack for a few minutes after removing them from the parchment lined baking sheet since they were still pretty soft. This sort of dries/sets the jam, too.
Thanks for the recipe!
These taste sooo goood! I was worried with the minimal reviews and how small the recipe was but I wanted to make these without almonds so this turned out perfectly! I just used a butter knife to divit the finger nails before the cookies cooled and dropped jam onto the finger tips!