
It’s easier than you may think to make a gluten free kids birthday cake that looks professional. The best part about making layer cakes covered in fondant is that you don’t have to do everything all in the same day. So, if you have the time, learn how to make this gluten free Minnie Mouse cake and similar cakes.
Templates:
You can simply do a Google search for the terms “template for Minnie Mouse” (or whatever you would like to create, print, and cut it out. You can do the same to find templates for the number 3 or whichever numeral(s) you need. Here are the templates I used:
Template for Minnie Mouse (This is similar to the one I used, but better since the ears are the same size. I had to cut one of the ears down on the template that I used.)
Template for Number 3 (page no longer online)
Gluten Free Recipe Links:
How to Make Cakes Without a Huge Dome with Tender Sides
Gluten Free Buttermilk & Sour Cream Chocolate Cake
Chocolate Swiss Meringue Buttercream using an additional 1/4 cup chocolate chips and omitting the mint extract. Alternatively, you can make Italian Buttercream, the flavor of choice.
Gluten Free Combination Fondant (Homemade Marshmallow Fondant and a little commercial fondant.)
Round Fondant Plungers on Aliexpress.com (takes about 2 months to receive, but inexpensive)
225+ Gluten Free Cake Recipes (While you can make other gluten free cake recipes, I chose the Gluten Free Buttermilk & Sour Cream Chocolate Cake because it is sturdy enough to withstand heavy fondant. For a yellow cake, I suggest something heavy like Gluten Free Butter Cake.
How Long Does It Take To Make This Cake?
It really depends how detailed you wish your cake to be. See the times below for this partricular cake. However, keep in mind, I took the time to match the colors in my Minnie Mouse template, which calls for additional time. I added a little more food coloring at a time, kneading it to see what it would like before adding a little more. If there’s one thing I’ve learned about working with fondant is that you can ruin a batch by adding too much of one color.
The time it takes to make a gluten free kids birthday cake also depends upon how many colors of fondant you use. I need pink, black, flesh, white, peachy-pink (for tongue), and dark pink (for bow, number 3, and the birthday girl’s name. You can easily omit a fondant Minnie Mouse and substitute it with a non-edible figurine. That will save you probably 8 hours because it took me about 4 hours of coloring the fondant and another 4 hours tracing, cutting, and gluing it all together.
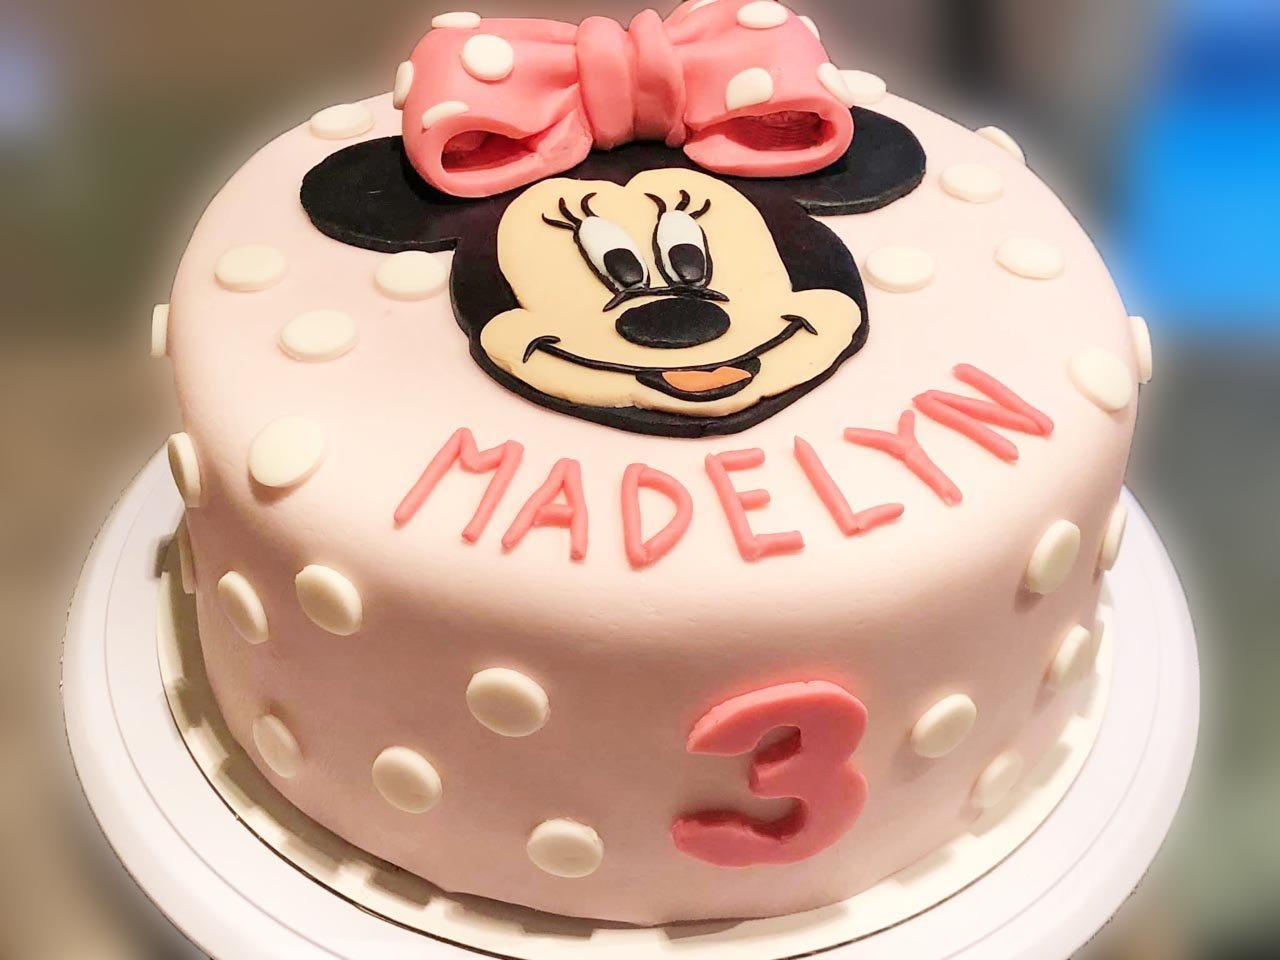
Gluten Free Kids Birthday Cake
Over several days, you can easily make this gluten free kids birthday cake, or a similar cake. The inside contains three tender chocolate layers sandwiched between layers of chocolate meringue buttercream.
Ingredients
- 1 recipe Gluten Free Chocolate Buttermilk & Sour Cream Cake (see above recipe link or your cake of choice)
- 1 recipe Chocolate Swiss Meringue Buttercream (see above recipe link)
- 1 recipe Fondant (divided for each color needed)
Instructions
-
Make the cake as instructed using the method for wrapping the pans with moistened paper towels wrapped in foil. To learn how to wrap the pans, read the above linked article .
-
Allow the cake layers to completely cool. Then, wrap each cake layer in plastic wrap and refrigerate until firm and completely chilled, or freeze until needed and defrost to room temperature prior to frosting.
-
Slice off any domed areas in order to make all three layers even. This usually occurs if you have uneven amounts of cake batter in each pan. However, this is an easy fix.
-
Whenever you wish to frost the cake, make the buttercream frosting and be sure your cake is at room temperature. Begin by placing a little frosting in the center of the surface you will be using as a base. (I used a 10-inch round cake board I got from Amazon.com.) Then, lay the first cake layer on top of the frosting, which will help anchor the entire cake.
-
Spread about 1 cup of frosting between the three layers. Be sure all three layers are the same size on the sides of the layers. If not, trim off any excess. Sometimes different brands of cake pan differ in size a bit.
-
Add only a thin layer on top of the cake and on the sides. This thin layer is known as an icing layer. When frosting the cake, be sure to use a dedicated spoon for scooping some of the frosting out of the mixing bowl into another container. Then use the frosting from the other container. This avoids getting any cake crumbs into the final frosting. Push as much frosting as necessary into any gaps between the layers so that the sides of the cake are even. Add a think layer of frosting to the top and sides. Refrigerate the cake until the frosting is set, about 2 hours.
-
Add additional frosting as necessary to the top and sides of the cake to make it level on top and even on the sides. Refrigerate again until the frosting is set and repeat as necessary. Freeze the entire cake, if desired.
-
One day prior to needing the fondant, make the recipe at the above link. The fondant will be off-white (as the polka dots in the above photo), even if you use clear vanilla extract.
-
Print out any templates you'll need such as Minnie Mouse and whatever number you'll need. Resize the template to fit your cake. I used about 6-inch wide and 5 inches high for my Minnie Mouse template and 3 inches for the number three.
-
Divide the fondant into the amounts you estimate that you will need for each color and store in separate zipper freezer storage bags or double sandwich bags and knead as much gel food coloring as desired into each piece of fondant. Leave any off white fondant alone in case you need to remake any colors or wish to add some to one that you've already made to lighten it. Allow the fondant to rest for at least 20 hours. The colors that you added a lot of food coloring will be quite soft. Leave the bags open for a few hours to allow some of the liquid to evaporate. They all should be about the same texture.
-
When you're ready to roll out the fondant for the cake, be sure to defrost the cake but you want it firm and cold with the frosting set. You can add fondant to a frozen cake, but don't attempt that until you have a little experience with fondant and can move quickly. Otherwise, the fondant will seize up and you may not be able to smooth out all of the skirt/sides of the cake.
-
Warm the fondant in the microwave until the fondant is easy to roll. You don't want any resistance. If it cools and you hit resistance, start over. Ball it all up and microwave it again. Then, roll out the fondant for the cake as instructed and cover the cake allowing the excess to hang on all sides. You want excess as it makes it easier to get smooth sides. Watch the video on How to Roll Out Fondant Over a Cake (see above link). Roll the fondant around a rolling pin and unroll it over the cake.

-
Using a fondant smoother or your hands, smooth out the top and sides of the fondant starting from the top and swiping downwards on the sides. Cutaway any excess fondant using kitchen scissors or an Exacto knife. (Be careful if you're using an Exacto knife as it will slice into whatever surface. Kitchen scissors are safest.)

-
In a mini-sized prep bowl or another container, take about 1/2 flat piece of white or off-white fondant and mix it with a little water to create a runny glue. You can leave the undissolved portion whole; set aside.
-
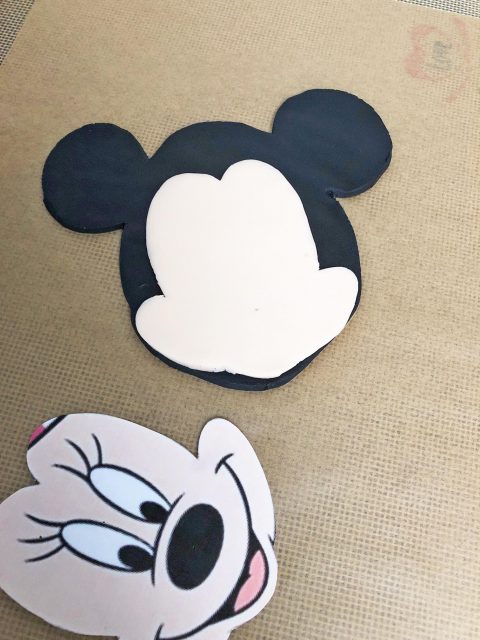
To decorate the cake, cut out all of the pieces of fondant you'll need from each color. If you're making the Minnie Mouse cake, roll out some black fondant on a sheet of parchment paper. You'll need to pretend the bow does not exist in your template so that you can cut out the full black portion of the face. Then, lay it on your black, rolled fondant, and cut around the paper. (I use an Exacto knife for this step.) That will be your first layer.
-
Next, cut out the flesh-colored face from the template, roll out the flesh-colored fondant, and lay the template on top. Cut around it, laying the top portion on one of your hands while you brush some glue on the bottom. Lay the glue side exactly where it should be on top of the black cutout fondant. The glue will leave a shiny surface almost like a snail trail if you drag it.
-
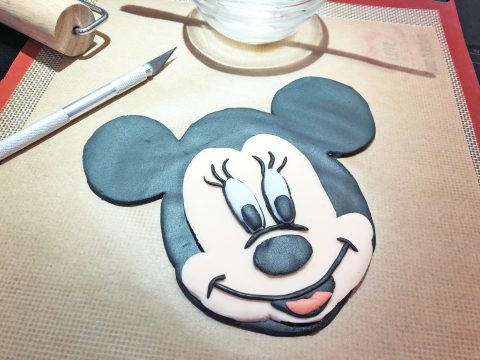
From here, it is easiest to work from the bottom of the face upward. Cut out just the mouth. Then you judge how long of a strip you'll need to roll between your hands for the thin line attached to the mouth. Glue the pieces on the fondant as needed. Then proceed to cut and glue the tongue, nose, line above the nose, black portion of eyes, white portion of eyes, and small round black oval for eyes (I use a dime-size piece and cut out each one freehand as they're too small to use the template.) Lastly, I make the eyelashes. Only glue the portion that is attached to the eye so that you can freely move the lashes in the position you desire.
-
Next, roll some of the bow-colored fondant out 3-inches wide and long enough to make a about a 4-1/4-inch wide bow, once it is poofed up. Fold the bow so the seam is underneath with minimum or no overlay. Add a wad of fondant to the center of each bow loop to keep it from becoming flat. Roll out and cut out another strip for the center of the bow and gather the two-loop bow in the center. Wrap the smaller fondant ribbon around with the seam underneath.
-
Glue the Minnie Mouse face to the cake near the top, allow some room for the bow between the ears, and a little above the ears. Glue on the bow.
-
Using a small fondant plunger, cut out several polka dots for bow and glue them on the bow.
-
Glue the number on the front of the cake.
-
Using whatever color fondant you choose for the name, roll small pieces of fondant into thin ropes. Using a ruler, cut 1-inch strips for the tallest portion of the letters such as the sides of the letters M, T, L, etc. Then, cut out about 1/4 to 1/3-inch long pieces for the middle of the letter M, the bottom of letter L, etc. The only tricky letter for me was the letter Y. You need to make the top and bottom pieces the same lengths. Carefully glue them on the cake. If you're using a frozen cake, condensation will build up onto the fondant. Wherever the condensation is on top of the cake, you will not need glue. The moisture will eventually go away and two sugary fondants will automatically bond together. However, when you have condensation on the sides of the cake, you may find that the fondant pieces will slide down the cake. So, instead, use the thick portion of the glue.
-
Then, using a medium-size fondant plunger, cut out several polka dots and glue them on the cake.
-
Store the cake at room temperature up to three days, preferably covered. I used a Tupperware cake carrier that I've had since the 80s.