
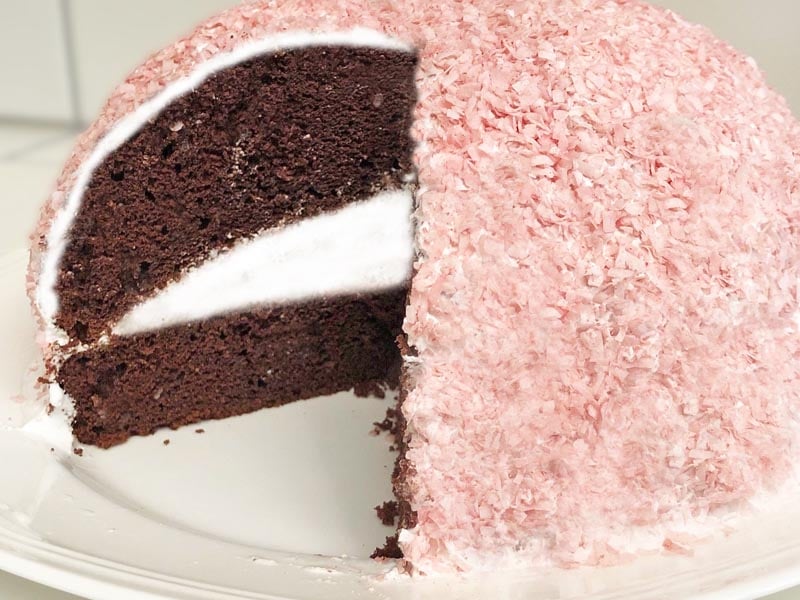
Remember those pink Hostess Snoballs? They were made of chocolate cake with a creamy and spongy marshmallow filling. That same spongey white filling was on the outside as well. Then, the entire thing was covered in pink coconut. This gluten free snowball cake is made the same but with natural food coloring. You don’t need a special pan to make this delicious cake, just two round cake pans, and a large bowl.
Links You’ll Need:
Chocolate Buttermilk Sour Cream Layer Cake
Homemade Almond Milk (Without Gum) – Gum causes your baked goods to become gummy and chewy.
New Dairy-Free Buttermilk Substitute Recipe
Gluten Free Snowball Cake
Rather than purchase a domed pan that really won’t make a good cake, use this easy method to make a gluten free snowball cake, even dairy-free and egg-free.
Ingredients
For the Filling and Frosting:
- 1 recipe Marshmallow Fluff cooked to 232°F (see above recipe link)
- 2 tablespoons butter melted
- 1 packet unflavored Knox gelatin 2 teaspoons
- 4 teaspoons water at room temperature
- 4 teaspoons boiling water
For the Chocolate Cake:
- 2 9-inch layers of Chocolate Buttermilk Sour Cream Layer Cake (see above recipe link)
For the Pink Coconut:
- 2 cups unsweetened coconut flakes or sweetened or shredded coconut
- 1 teaspoon beet powder for coloring (or a couple drops of food coloring)
- 1 teaspoon water
- 20 drops of liquid stevia if using unsweetened coconut (optional) (or 1/4 teaspoon more water)
Instructions
-
While the cake cools, using your fingers or a spoon, toss together the coconut flakes beet powder, water, and stevia, if using. If you have a food processor, use it instead, on the “pulse” setting instead as it helps to distribute the color evenly and chops the coconut flakes/strips into small pieces. If you don't use a food processor, use kitchen scissors to cut the coconut by placing it in a bowl, making several cuts over and over again.
-
To Assemble the Cake:
-
Slice off the dome of one of the layers; set aside the domed portion for snacking and set aside the flat layer.
-
Slice the domed layer in four equal pieces. (If you’re using a smaller bowl, slice the pieces into 6 or even 8 equal pieces so that you can leave some out as needed to fit inside the bowl.
-
Line a large bowl with two long sheets of plastic wrap, intersecting each other at the bottom of bowl, leaving about 6 inches overhanging the bowl.
-
Place each of the four sections in the bowl, meeting together in the middle. You’ll have to squeeze the last piece in but the cake gives easily.
-
Scoop enough marshmallow filling to fill the center, a little over 1 cup, allowing about a 1-inch area around the edges alone.
-
Lay the flat layer on top and wrap using the overhung plastic wrap. Refrigerate for about 2 hours so that it keeps its shape. Refrigerate the leftover
-
Unwrap to expose the flat layer and invert onto a serving platter. Using the leftover marshmallow filling, frost the entire cake.
-
Sprinkle the marshmallow frosting with the pink coconut and pat in using your hands. For the bottom sides, you’ll need to place the coconut in your hands and pat into the marshmallow.
-
Serve immediately or refrigerate until ready. You may refrigerate it for up to one day. The texture of the cake is much better if you leave it out to reach room temperature. Slice and freeze any leftovers once sliced. Homemade goods stale quickly at room temperature and in even faster in the refrigerator due to the lack of preservatives. Defrost frozen slices at room temperature.
Tips
*If you’re using 8-inch cake pans, be sure to use a smaller bowl, probably a 2-quart would work well. You may have to cut the flat layer down to size to fit the width of the top of the bowl.
NOTE: I made the above-pictured cake using dairy-free sour cream, Tofuti brand (contains soy). However, it made the cake batter gummy. So, I added 2 tablespoons more oil and 1/4 cup of water. It turned out great.
For Dairy-Free Buttermilk:
Combine 3 tablespoons apple cider vinegar with enough dairy-free (gum-free) milk to make 1 cup. Adjust amounts as necessary. I like to use homemade almond milk (see above link at the top of the page). For a non-vinegar version, see the above link at the top of the page.)
Egg-Free:
For egg-free, replace each egg white with 2 tablespoons of liquid from a can of white beans. I like the flavor of white kidney/cannellini beans. Replace each egg yolk with 1 tablespoon refined coconut oil (for no flavor), unrefined coconut oil (for coconut flavor), or heavy cream or melted and cooled butter (if you’re dairy-tolerant).