
The most raved-about gluten free pie recipe on this site is the Flaky Gluten Free Pie Crust Recipe. After spending an entire day making gluten free pies, I have some new advice to share. In this article, I also share how to make gluten free pies in advance and freeze them.
How Xanthan Gum Affects Gluten Free Pies
The first few couple of times I made pies using this recipe, I made an extremely flaky crust. Knowing pie recipes such as those calling for fresh apples need a sturdier crust, I increased the xanthan gum by 1/2 teaspoon in this recipe (2-1/2 teaspoons). It made the crust so easy to roll, too.
However, if you are using canned pie filling, such as Comstock brand, or you are using a soft or custard filling, you don’t need such a sturdy crust. You can either use the minimum amount of xanthan gum (2 teaspoons) or increase to the halfway amount, 2-1/4 teaspoons.
Note: The more xanthan gum you add, the less flaky the crust turns out. To combat the hard-to-handle, fragile dough, just refrigerate the dough so that it is easier to roll and transfer.
Learn how to make any type of pie in advance whether you wish to prebake it or not.
Ingredients:
- 1 recipe Flaky Gluten Free Pie Crust
- Your favorite filling (use 2 cans of Comstock or Wilderness pie filling for a standard pie dish [1-1/4-inches deep] and 3 cans for a deep-dish [1-1/2 to 2-inches deep])
- 1 egg yolk + 1 tablespoon cream (or 1 whole egg) (for egg-free, use cream)
- Granulated sugar (optional)
Instructions:
- First, make the pie dough in the above recipe link. Refrigerate the dough 15 - 20 minutes or freeze for 7 - 10 minutes. The less xanthan gum you add, the longer it should be chilled. You want to chill the dough just long enough to make it roll easily. (If you handle the dough too much, two things occur. The dough softens and will be harder to work with. In this case, pop it in the freezer a few minutes until it hardens again. If you over-chill the dough, leave it out at room temperature until it softens a bit. Don't knead it into a softer dough or you will turn out a tough crust.
- Refrigerate the dough 15 - 20 minutes or freeze for 7 - 10 minutes. The less xanthan gum you add, the longer it should be chilled. You want to chill the dough just long enough to make it roll easily. (If you handle the dough too much, two things occur. The dough softens and will be harder to work with. In this case, pop it in the freezer a few minutes until it hardens again. If you over-chill the dough, leave it out at room temperature until it softens a bit. Don't knead it into a softer dough or you will turn out a tough crust.
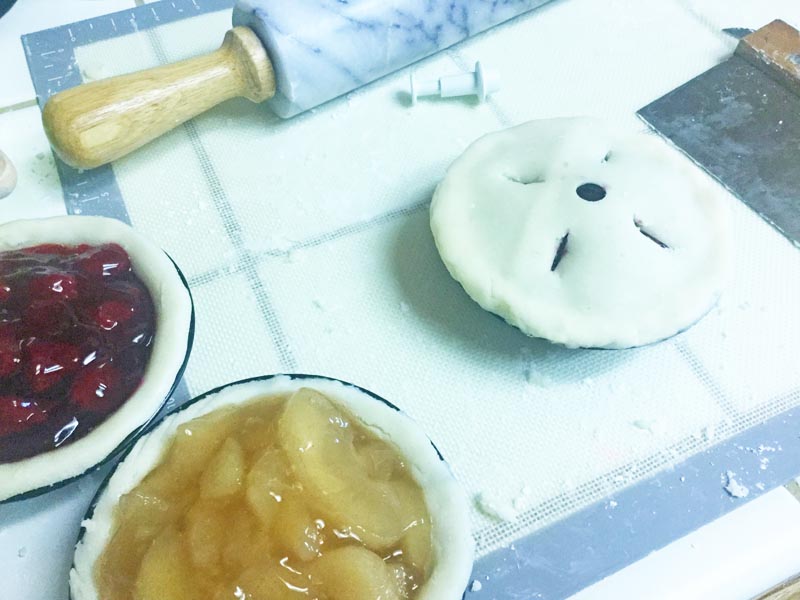
- Cut the dough in half and place the dough in bottom of the pie. When using a minimum amount of xanthan gum, you'll need to press the dough to distribute it on the bottom of the pie plate and up the sides. For a smoother crust, use this handy dough roller directly in the pie plate. For a sturdier dough, you can roll it using a rolling pin and transfer it to the pie plate. Cut the dough using a sharp knife or kitchen scissors up against the rim of the pan. You only need to leave 1/4-inch of dough on the rim of the pan.
- Freeze the dough in the pie plate while you roll out the top dough. Cut out a 1/3-inch hole in the center of the dough to allow steam to escape. Also, slice the dough in about 5 places.
- If you're making a custard or pumpkin pie, I suggest freezing the filling separately. Then defrost the filling in the refrigerator at least 8 hours prior to baking. Alternatively, you can bake the entire pie, allow to cool completely, wrap in plastic wrap and aluminum foil. Then defrost in the refrigerator overnight and bake for 15 minutes in a preheated 375ºF oven.
- Baste the bottom, sides, and rim of the dough with egg white. Fill with your desired fruit filling, and place the top dough on top. Press the edges to seal and crimp or scallop as desired. Open up the 5 slices so that they serve as vents to allow steam to escape.
- Baste the dough with your desired egg wash. I like to use 1 egg yolk with 1 tablespoon cream. You can use a whole egg, or just egg white for a lighter crust.
- Place in freezer until the top of the crust is frozen solid, 30 - 60 minutes. Wrap in plastic wrap and then in foil. Freeze as long as 6 months.
- Bake on a baking sheet lined with foil (to catch any spills) at 400ºF for 20 minutes or until the crust edges are brown. Remove from oven, cover the edges with foil and baste the top of the dough with melted butter. Sprinkle sugar on top, if using. Return to the oven and bake for an additional 20 - 30 minutes or until bubbly and golden brown on top.
- Bake on a baking sheet lined with foil (to catch any spills) at 400ºF for 30 minutes. Lower temperature to 350ºF for 30 - 45 additional minutes or until bubbly and crust is golden brown.
- Allow to cool on a wire rack prior to serving. Top with The Perfect Homemade Sweetened Whipped Cream or vanilla ice cream.
Tips
For a crisper bottom crust, preheat the baking sheet when you preheat the oven.
When freezing pies, be sure to cool down and filling prior to adding it to the crust.
You can also make a lattice topped crust. See how to make a lattice topped crust here on SimplyRecipes website.
Be sure to test out any recipe prior to the actual holiday baking. I enjoy making mini pies to test out pie crust using 4-inch pie pans
If your pie tends to be soggy on the bottom, try baking it on the bottom shelf and then bringing it to the top shelf to brown. Also, basting the bottom dough with egg white seals the crust to prevent sogginess.