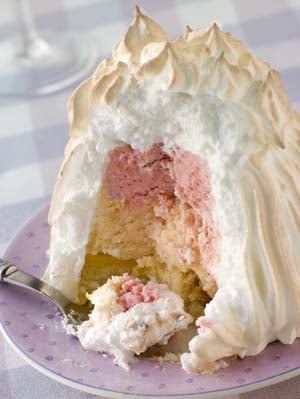
Individual portions of gluten free Baked Alaska creates an elegant dessert. It is special enough to even serve for Valentine’s Day. You can get creative and use something other than the traditional base, sponge cake. You may use brownies, chocolate cake, and pound cake, to name a few. The best part? – the ice cream surprise, right in the middle! Enjoy.

Bake like a chef with this gluten free baked alaska recipe. Make them to order by choosing your favorite cake, ice cream, or even brownies or cookies.
Ingredients:
- 1 recipe Gluten Free Sponge Cake
- 2 1/2 pints ice cream (dairy-free, if needed), two different flavors, softened
- 8 large egg whites
- 1/16 teaspoon salt
- 1 cup granulated sugar
Instructions:
- Make the individual sponge cakes as directed at the above link and allow to cool.
- Line a baking sheet with parchment paper and set aside.
- While the cakes are cooling, scoop the ice cream into leftover containers or other dishes to stack on top of the cake. The bottom scoop should be a little larger than the top scoop. You may also distribute one flavor into bowls, freeze, and then add the second flavor and freeze. Alternatively, yu can skip this step and scoop the ice cream directly on top of the cake when the time comes. Freeze the molded ice cream.
- Place each cooled cake on the prepared baking sheet and freeze for about 30 minutes.
- Add the two ice cream flavor layers and freeze for an additional 30 minutes. (To unmold the ice cream, just allow the container to sit in warm/hot water until it slips out.)
- While the cakes and ice cream are freezing, beat the egg whites and salt in the bowl of your mixer until they reach soft peaks.
- Add sugar, a little at a time, and beat until the mixture reaches stiff peaks, about 5 minutes using a stand mixer and 10 minutes or longer using a hand mixer.
- Quickly pipe the meringue onto the cake and ice cream layers. Pipe a thicker layer on the top. Alternatively, you may scoop the meringue on top and swirl a special design using a rubber spatula.
- Freeze them for about 2 hours or until firm.
- Preheat the oven to 475ºF.
- Bake the cakes on the center shelf for until the tips of the meringue are golden, about 5 minutes.
- Allow the cake to rest for 5 to 10 minutes before slicing. Immediately freeze leftovers.
Tips
If you desire the cakes to be perfectly shaped, cut out a small section of the cake round and place it back into the cake pan. Then when you add the meringue, it will stay perfectly shaped when baked.
If you do not desire a thick piece of cake, you can slice each one in half and make eight cakes. Of course, you'll need to double all other ingredients.


