
For pie crusts, I usually use my Gluten Free Phyllo Dough Recipe, as I created it long ago when I was satisfied with this heavier texture as a substitute for phyllo dough. However, it turned out to be a wonderful gluten free pie crust recipe instead, but it is not dairy-free. I used it in my Gluten Free Peach Custard Tart. This new recipe is dairy-free.I decided to experiment with a new gluten free pie crust recipe, without little starch, for a number of reasons. I am again, allergic to tapioca, (so no tapioca starch for me anymore); there is just too much starch in most gluten free recipes; and I have many readers who are dairy-free, and this new recipe is dairy-free.
You may have heard some gluten free recipes calling for sweet flour available at Asian grocery stores, or glutenous/glutinous rice flour, which is the same product. Because of its high gluten-like qualities, I experimented with using a high quantity in this dough, versus heavy starch. I really want to get back to using more whole grains, so I added a bit of sorghum flour, as well.
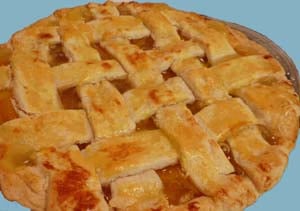
I made a peach pie using Comstock filling and the use of a 9 1/2-inch pie dish. Though I prefer fresh, when I’m experimenting, it is just not worth the effort, in case it doesn’t turn out well. I’m not a big pie fan, but my husband is, very much so, and loved this recipe. It’s flaky, not firm. If you desire a crust that holds together more, add additional gum, about 1 teaspoon. My fave is still the one that contains dairy, though, the Gluten Free Phyllo Dough recipe. Enjoy!

Ingredients:
- 1/2 cup unsalted butter, cold or dairy-free buttery spread)
- 1/2 cup shortening, cold or frozen
- ¼+ filtered water
- 2 cups sweet rice flour
- 1/2 cup sorghum flour
- 1/4 cup cornstarch (or potato starch)
- 2 teaspoons xanthan or guar gum
- 1 1/2 teaspoons fine sea salt
- ¼ cup sugar
- 1 large egg, beaten beaten
Instructions:
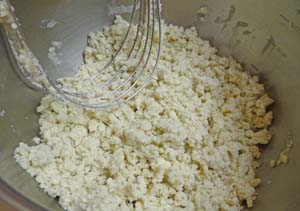
- Place the dry ingredients in a bowl; whisk together.
- Add butter and shortening to flour mixture; cut into flour with a pastry cutter or 2 knives until about the size of peas, or until all fat and flour is combined.
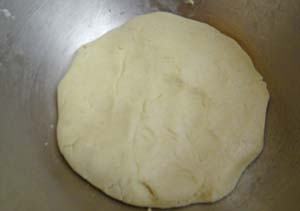
- Add ¼ cup cold water or more if needed, enough to make the dough pliable, like playdough; and cut into dough. With your hands, form a disc shape; cut in half (or weight them out evenly). Shape the two portions separately into disc shapes. In the same bowl you used for the dough, add a bit of cooking oil; moisten the outside of the discs with the oil.
- Refrigerate them until firm, about 30 minutes or longer. You may stack them on top of each other, as they will not stick together.
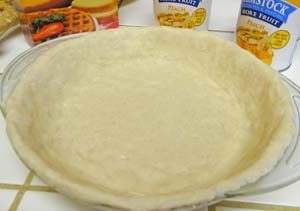
- Place the dough in the bottom of a 9 to 9 ½-inch pie pan and press the dough into the dish and spread with your fingers all the way up the sides, and over the rim. If you own a pastry roller, use it smooth out the bumps from your fingers.
- Add your filling.
- Preheat the oven to 375°F.
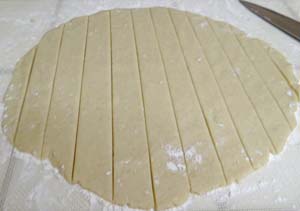
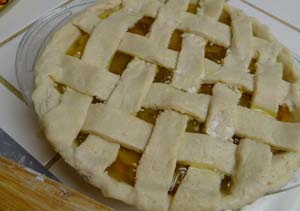
- With the second disc, roll out the dough to about 10-inches onto a flour or starched surface. Either cut shapes of dough, using a cookie cutter, or cut the dough into 1-inch strips to place on top, creating a lattice design.
- To create a lattaice patter, using every other strip, lay them across the top of the pie. Then with the other strips, cut them into shorter pieces, tucking them over and under the other longer pieces, creating a lattice effect, without actually using full length pieces for the second portion. Moistened your fingertips with water and press to seal edges. With your finger tips, dab a little water on any cracked or broken pieces, and/or patch with pieces of dough and smooth out with a little more water.
- Brush top of crust with beaten egg. If you forget this step, as I did, use pure egg yolk towards the end of baking.
- Bake for approximately 45 minutes and golden brown. At about 30 - 35 minutes or whenever the outer crust becomes brown enough, cover the edges with aluminum foil.
- Remove the pie from oven and place on a cooling rack for at least 20 minutes before slicing. Slicing earlier allows the juices to penetrate the bottom crust, making it soggy.
- Serve warm or cold. Garnish with whipped cream (lightly sweetened or unsweetened), if desired.
Tips
For a single pie crust cut recipe in half, and skip the egg wash.
To make a fresh fruit pie with sweet fruit such as apples, peaches, or pears, add 1 tablespoon corn or potato starch, 1/2 cup sugar, and 1/4 teaspoon salt, if desired to the fruit; toss together; and allow to sit while making the crust. For tarter fruit, add more sugar.
To make fresh fruit filling ahead of time, add prepared fruit to a pie pan lined with foil or parchment paper; cover with another piece of foil or parchment paper; and freeze immediately (to prevent discoloration). Once frozen solid, remove the fruit mold from the pie dish and freeze in a ziplocked bag. When ready to use, line a pie plate with prepared crust and place frozen peaches on top. Bake in a 450°F oven on the bottom rack for 20 minutes; then decrease heat to 375°F and bake for an additional 30 - 35 minutes, or until completely warmed through.
To prevent the bottom pie crust from becoming soggy, consider: pre-baking the bottom crust for 7-10 minutes; or coat the bottom pie crust with corn syrup or brown rice syrup to seal it. For gluten pie crust another tip is to bake the pie on a lower rack in your oven, however, because it harder to brown gluten free pie crust, it best baked on the center rack.
Thank you for having a gluten-free, tapioca free, white potato free, dairy free and soy free crust! I am allergic to all 5 major ingredients found in most foods. I not sure what I would’ve done without this website!!!
Kim Kurzdorfer
You are very welcome, Kim. I’m glad you enjoy my site!
I’m allergic to tapioca, now, thus this crust. Sweet rice flour is much starchier than regular rice flour. Perhaps you can begin experimenting yourself! :-)
Enjoy!
Carla
Can this crust be used for mini pie crusts too? I would love to do apple, pumpkin, blueberry, tart cherry, and pecan to name a few. Maybe chocolate too.
I do want to use the crust recipe. Do you recommend lard for the other shortening instead of using all butter?
Thank you.
Beverly Kendrick
Beverly, I’m glad you like the recipe. Thanks.
I do not recommend using all lard, as it will make the crust too delicate. Flaky crust tends to get soggy as it is. Shortening and lard make a crust flaky, and butter provide flavor, as well as making it heavier. This crust couldn’t stand much more shortening or lard.
Hope this helps.
Carla