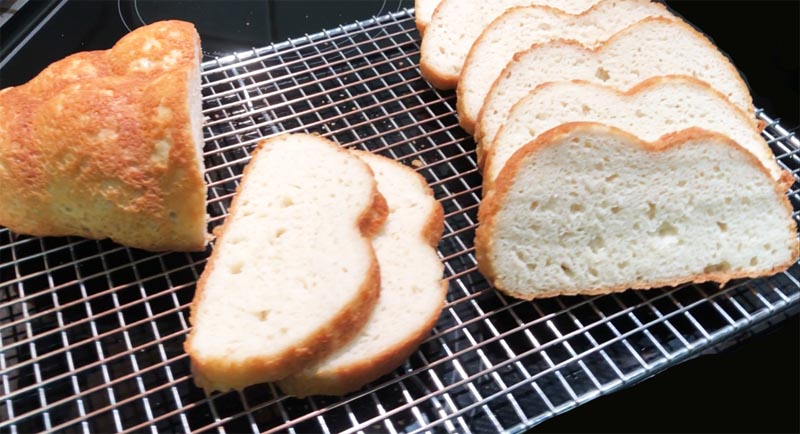
I’ve been developing gluten free bread recipes for almost a decade. This is the best gluten free French bread I have ever had and it’s crusty! You can make this gluten free dairy free French bread recipe without kneading any dough. You don’t even have to pipe a wet dough into a French bread pan as so many gluten free French bread recipes require. Use your heavy-duty electric mixer to make this bread along with one of the five pans that I suggest.
View the Video at Gluten-Free Dairy-Free French Bread Video.
Special Loaf Pan:
I ordered this Braided Mold Loaf Pan thinking I would need it for a sweet, Italian bread I was planning to make for Easter. However, it dawned on me that this pan would be perfect to make the process of making French bread much easier, and more attractive. I don’t know how attractive you think it looks, but it sure was convenient. It really did make the entire process easier and more aesthetic. To give you an idea of the size of this pan, a standard 9 x 5-inch loaf pan holds 7-1/2 cups of liquid. This pan holds 6 cups. If this pan continues to be out stock, be sure to use a similar pan but be sure it is metal not silicone.
French Bread Pan:
You can add the dough to a Ziplock gallon-size bag and cut about one inch off of one of the bottom corners. Then pipe the dough onto the French bread pan. You can also use a baguette pan and make two baguettes. Of course, the baking time will need to be reduced. I haven’t tried this yet, but will and then type a new recipe.
Perforated French Bread Pan:
If you use a perforated French bread pan, use the method above in the French Bread Pan, but line the bottom of the pan with parchment paper.
Improvised French Bread Pan Using a Roasting Pan:
If you want that French bread appearance with the round bottom, you can improvise by making a mock French bread pan.
What you’ll need:
- Roasting Pan
- Canning Jars
- Parchment Paper
- 2 – 4 Binder Clips
To make a double recipe/two French loaves, lay oven-proof jars on their sides (that can withstand up to 450ºF temperatures) down the center of the length of the roasting pan. (Canning jars without lids work perfectly.) (Ideally, when the jars are on their sides, they should be as tall as the sides of your roasting pan, but a little higher won’t hurt.) You want to create a wall down the center of the pan which will form a divider. Lay sheets of parchment over the jars, leaving plenty of overhang on the left and right sides of the pan, creating two hammock-like cradles between them. Push the paper down on the left and right sides of the jars to form the two hammocks/pockets where the dough will lay. Use binder clips to keep the parchment in place by clipping them to the sides of the pan.
Roasting Pan – 1 Loaf:
If you have an unusually long loaf pan, you can make a single loaf. Another option is to use canning jars on both sides of a roasting pan to make a single loaf.
9 x 5-Inch Loaf Pan:
The last option would be to use a standard 9 x 5-inch loaf pan. You may need to bake the bread a little longer, perhaps adding as little as 10 minutes to the current time and as much as 20 minutes. I haven’t tried this yet.
About This Recipe:
There are two things that make this recipe crusty. Oil always makes things crispy where butter makes baked goods soft. Baking soda also makes baked goods crisper and creates a nice brown color crust.
Experiment with Second Loaf:
I tried a second version of this loaf without the baking soda, but the crust was not nearly as crunchy. Mind you, gluten free bread won’t stay crusty. However, it was evident that the baking soda made a huge difference. The reason why I wanted to try omitting the baking soda was due to too much leavener. On the original loaf, the current recipe, the top of the bread did not stay fully risen during baking. This is an indication of either too much liquid or leavener. In this case, it was too much leavener. It obviously didn’t fall much because there was no solid mass of condensed dough at the bottom of the loaf. However, I always strive for perfection.
In the second loaf, I tried a technique I haven’t used in a few years. I beat the egg whites to soft peaks, set them aside, and then beat them into the dough after mixing the dry ingredients into the wet. I really do think that helped give it the oomph that tapioca provides, without the gumminess. So, I incorporated that idea into the final recipe though I haven’t used it in the final recipe.
In the final recipe, I decided to reduce the yeast by 1 teaspoon just because I know the leavener needs to be reduced. I will make this bread again, and update any changes I deem appropriate. If it truly does rise higher, I will update the photo as well. So, definitely check back soon!

A crusty gluten-free dairy-free French bread recipe where the inside dough is much like gluten French bread. You can make the gluten free French bread in one of five different pans. Sheer awesomeness!
Ingredients:
- 3 large egg whites (or 6 tablespoons liquid from white kidney/cannellini beans)
- 1-1/2 cups water
- 2 tablespoons neutral-flavored oil (extra-light olive oil)
- 1 teaspoon apple cider vinegar
- 2 cups rice flour (I used 1/4 cup white + 1-3/4 cup brown) (Bob's Red Mill)
- 1 cup cornstarch (Bob's Red Mill)
- 2 tablespoons granulated sugar
- 1 tablespoon xanthan gum (or guar gum)
- 2 tablespoons instant yeast (SAF)
- 1-3/4 teaspoons salt
- 1/4 teaspoon baking soda
Instructions:
- Prepare your pan of choice as indicated above. If using, oil the braided pan or 9 x 5-inch loaf pan. There is no need to oil any of the methods using parchment paper such as the sling using canning jars or a perforated pan.
- Beat the egg whites in the bowl of your electric stand mixer; remove and set aside.
- Warm the water to between 100 - 115ºF; add to the mixing bowl along with oil, and vinegar. Mix on low to combine.
- In a separate bowl, whisk together the rice flour, cornstarch, sugar, xanthan gum, yeast, salt, and baking soda. Add to the mixing bowl and beat for 2 minutes or until thoroughly combined.
- Scoop in the egg whites and mix on low until you no longer see any egg whites in the dough, about 1 minute.
- Scoop the dough into one mass/ball and cover the mixing bowl with a tea towel. Allow the dough to rise in an 80 - 100ºF degree environment for 25 minutes.
- Scoop the dough into your pan of choice using a silicone baking spatula. Poke the dough in a couple of places to allow some of the gas/air to escape. Then, sprinkle with a little water and smooth out the top. (Alternatively, you can dip your spatula in a glass of water several times to use to smooth out the top of the dough.) Set aside to rise for 20 - 25 minutes or until the top begins to bust open.
- Preheat the oven to 450ºF.
- Once the dough rises the second time and the oven is fully preheated, reduce temperature to 400ºF and bake for bread on the center shelf for 40 minutes.
- Remove from the oven and immediately transfer the loaf to a wire rack without any parchment paper under the bread. Allow the bread to cool for about 1 hour. (Slicing sooner may result in a gummy texture.)
- Slice using a serrated knife and enjoy!


Looks great! Can I use aquafaba from chickpeas instead of egg whites?
Jackie,
I haven’t tried aquafaba and this particular recipe, but when I use it, I don’t use chickpea aquafaba. I like the taste of white kidney bean aquafaba.
If you use it, please let me know how it turns out. I always use equal amounts of aqua fava to egg white: each egg white is equal to about 2 tablespoons of liquid.
Carla
Well, this bread dries out very quickly and uses an insane amount of yeast. Not sure why it would be called French Bread as dairy is not an approved additive to have the “French Bread” designation.
… and my quest continues….
Andre,
You have to realize that sometimes to get particular texture in a gluten free item, some uncommon ingredients are used. You’ll find that most homemade gluten-free bread will dry out quickly. Freeze individual slices of bread and use as needed.
In addition, as a student, I would appreciate your feedback in the Facebook student area so that I can help you there.
Carla
The instructions are incomplete, i.e.:
1. “Prepare your pan of choice as indicated above (above where?) If using (using what?)etc. There is no need (nothing after that)
Denny,
Please read about this recipe starting from the top of the page, above the recipe. There, you’ll find the sections on the pans in detail.
“If using,…” refers to the following “bread pan or 9 x 5-inch loaf pan”.
Yes. You are correct. Step one did get cut off. It should read, “There is no need to…oil any of the methods using parchment paper.”
I hope this helps.
Carla