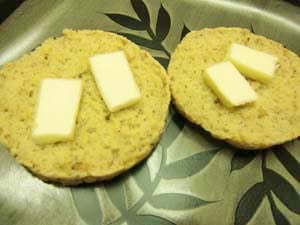
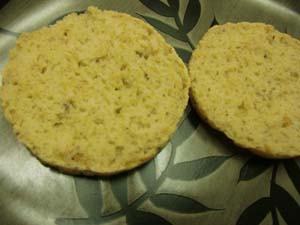
These English muffins provide an authentic texture, and if you use cornmeal on the bottom and top, they provide the same flavor. They are a perfect way to start your day.
A few weeks ago I tried creating yeast-free, gluten free English muffins, but only tried once, and it didn’t work out very well. So, I thought this time around, I’d start with a yeast recipe. I used my favorite gluten-free bread recipe.
Straight out of the pan, they taste like they’ve just been toasted, on the bottoms! Mmmm…I enjoyed them this way, and hope you will, as well. These gluten free English muffins are the best, and the recipe of which I am most proud so far (as well as as my Gluten Free Egg Rolls Recipes .) They bring back memories and flavors of eating Thomas’ English Muffins.
Commercial Brands:
- Glutino also makes them, but they contain soy lecithin. Update – Feb. 1, 2016: I’ve read wonderful reviews.
- Food For Life has them in Brown Rice and Multi-Seed, and are soy-free.
- Foods By George makes one that is very fluffy and is also soy-free.
- Ener-G Foods makes gluten free English muffins, but they contain tofu (soy). However, they are dairy-free and egg-free. They don’t taste anything like an English muffin, but they make an awesome sandwich roll or toast! They’re light, too!
Link You May Need:
I use English muffin rings that I bought off of Amazon.

Looks like an English muffin. Tastes like an English muffin. But it's a gluten free English muffin! Who would've known!
Ingredients:
- 1 cup water, heated to 110°F
- 1-1/2 tablespoons agave syrup
- 1 packet or 2-1/4 teaspoons instant dry yeast
- 1-1/4 cups gluten-free oat flour
- 1 cup potato starch
- 1/2 cup tapioca flour
- 1/4 cup flax seed meal
- 1-1/2 teaspoons xanthan gum
- 1-1/2 teaspoons guar gum
- 3/4 teaspoon salt
- 4 large egg whites or 3 extra-large, at room temperature
- 2 teaspoons gluten-free apple cider vinegar
- 1/4 cup extra-virgin olive oil
- Gluten-free spray oil (or oil), for pan and rings
- 2 tablespoons gluten-free cornmeal, for dusting (optional, but recommended)
Instructions:
- Add eight English Muffin Rings to an electric skillet and two to a traditional skillet. Alternatively, shape dough by hand and/or use traditional skillets. Oil the inside of the rings and the bottom of the skillet (only inside the rings).
- Preheat covered skillets to 170 - 200°F or over low heat, to create a fast-rising environment.
- Mix warm water, agave, and yeast in a cup; set aside until foamy on the top, 5 minutes or more.
- Whisk together the dry ingredients; set aside.
- Beat eggs at high speed in a large mixing bowl until large bubbles appear.
- Add vinegar, oil, and yeast mixture to the bowl and mix on low speed until just combined.
- Add dry mixture, all at once, and beat for a short time until moist. Then increase speed to high and beat for 1 minute. Turn off electric skillet or remove traditional skillets from heat.
- Sprinkle the inside of each ring with 1/2 teaspoon cornmeal, if using. Distribute batter evenly among the 10 rings. Using the back of your fingers, dipped in water, distribute the dough so that it touches the rings on all sides.
- Dust the top with additional cornmeal and press lightly into the dough.
- Cover skillet and allow dough to rise for about 35 - 40 minutes. The dough should reach the tops of the rings. However, some will rise a little over the rim and others a little under.
- Heat the skillets to 350°F or over medium heat, keeping them covered. Cook for 5 - 8 minutes or until brown at the bottom and they separate from the rings. Turn the muffins over to brown the other side. Cook on second side for an additional 5 - 8 minutes.
- Using a spatula, remove the rings; set aside to cool. Transfer the muffins to a wire rack to cool.
- Allow muffins to cool 1 - 2 minutes and slice any you are about to serve with a serrated knife. They are already nicely toasted on the bottoms. If you desire the top toasted as well, place them in a toaster oven or under the broiler for a short time, cut side up.
- Serve warm and add your favorite toppings such as butter, buttery spread, peanut butter, nut butter, jelly, and savory fruit sauce, to name a few. They are best served the same day that you make them. Freeze leftovers in a resealable freezer bag.

Tips
You can probably make these in any skillet, but you'll need to watch them closely and try to maintain the temperature. In addition, make sure you use a skillet or pan with a lid. If you use a normal frying pan you will end up having to make them in several batches.
Definitely add more salt if you're not on a low-sodium diet.
You can make a large batch of the dry ingredients and make a great gluten free bread using my Oat and Flax Seed Sandwich Bread Recipe.
*You can make your own English muffin rings using aluminum foil. However, because they are flexible, it makes it more difficult to fill with batter. The batter is thick.
The longer you allow the English muffins to rise, the more nooks and crannies they create. However, do not allow the top of each muffin to crack. Cracking is an indication of over-rising.
Substitutions:
You should be able to substitute the oat flour for sorghum.
You can also substitute the tapioca starch for cornstarch and add 1/16 to 1/8 extra xanthan gum. Cornstarch is a great addition to gluten-free baked goods. Bob's Red Mill carries a cornstarch that is non-GMO.
Nutritional Facts:
- Calories 236.2
- Total Fat 7.8 g
- Saturated Fat 1.0 g
- Polyunsaturated Fat 1.3 g
- Monounsaturated Fat 4.0 g
- Cholesterol 0.0 mg
- Sodium 248.5 mg
- Potassium 28.4 mg
- Total Carbohydrate 37.6 g
- Dietary Fiber 3.3 g
- Sugars 2.5 g
- Protein 4.9 g
Weight Watchers Points: 7
If you are on a low-sodium diet, use all guar gum


Carla,
I make these a lot. So, I decided to mix the dry ingredients ahead of time for several batches to save time. Oh no, I did not know how measure out for it once it was all mixed together.
I mixed all the dry ingredients through the salt.
So I just went through each ingredient and measured out the amount for that ingredient. Not sure it was time saving.
Can I add up all the amounts and use that for the total, or should I not do that again? Haven’t made them yet. Getting ready to. Hope they turn out. Cynthia
Hi Cynthia,
I have found that when I make a large batch of dry gluten free mix from one of my recipes that when I measure it out by ingredients after the fact that I inevitably have some mix leftover. I use the dry cup measuring cups to measure dry ingredients and spoon in the mix. This prevents packing in dry ingredients when you shake a glass measuring cup to even out the top, or worse, tap it on the counter. Since you’ve made this recipe several times, you probably know what the consistency of the dough should be. So, make the recipe by your suggested measuring technique and if you feel the dough is not stiff enough, sprinkle in a little more.
In the future, make one batch and weight the ingredients. Then total them all up. Thereafter, you’ll know how much to use by weight.
Good luck!
Carla
I have made several times and love them.
Two worries though, how long does it take to get large bubbles in the egg whites? Do you use the whisk on the mixer or regular beater?
And my yeast has clumps? How does one avoid that?
Thank you. I have loved everything I have made from your site.
Hi Cynthia,
I’m glad you’ve been enjoying this recipe.
What I mean by large bubbles, is just bubbles, not a fine foam as in stiff or soft peaked egg whites. The time varies depending upon the power of your mixer.
Use a whisk attachment always, ipunless otherwise noted.
Don’t worry about your yeast clumping. Just be sure the yeast gets moistened by stirring it in th liquid. Then be sure the liquid is foamy before adding it to the mixing bowl.
You are very welcome. Thanks for taking the time to express your gratitude.
Carla
These look fabulous! I saw on another website that one blogger didn’t have muffin rings so she used foil and made her own rings! Since I don’t have muffin rings myself, going to use the foil rings with your recipe and method! I’m already drooling! LOL Thanks!
I made these yesterday for dinner and they are wonderful! Like your intro says–they look like an English muffin, they taste like an English muffin! I did sub some of the oat flour, using 1/2 cup of Gluten Free Café all purpose flour, but the rest was the same. Also, I gently fork split the rest and froze them last night. This morning I lightly defrosted one, used a fork to finish splitting, then toasted it for breakfast–just as good as yesterday’s muffin! I am going to make a batch for my Aunt Cheryl, she has CD! I know she’ll love these! Thanks! YOU ROCK!
Can the eggs be substituted with gel eggs? Or egg replacer?
Hi Michelle,
I haven’t tried it, but this is just one of my bread recipes anyway. For an egg-free bread to use instead of the dough in this recipe, see – http://glutenfreerecipebox.com/dairy-free-gluten-free-egg-free-bread/.
Enjoy!
Carla
Do you think that this could be baked as a loaf? I have a loaf recipe for English muffin bread (not gluten free) and have been interested in finding a similar type GF recipe. Thanks!
Hi Denise,
This is actually the ingredients from an existing gluten-free bread recipe on this site. Please see: http://glutenfreerecipebox.com/gluten-free-oat-flaxseed-sandwich-bread/. If you can tolerate dairy, this one makes an awesome bread: http://glutenfreerecipebox.com/gluten-free-oat-bread-2/.
All you would have to do for an English muffin flavor is flour the pan after oiling it with cornmeal.
Enjoy,
Carla
Luv english muffins … still missing my Thomas’ with the nooks n crannys for butter …mmmmmm. Anyway, since I don’t have an electric skillet, could I warm up dutch oven, reg oven or even slow cooker to ‘rise’ them? Also, will homemade tin foil circles do…?
I don’t own an electric skillet … could I warm up my dutch oven and use it to ‘rise’ the dough and then bake in an oven? They sound delicious. I miss my Thomas’ english muffins in the morning… can’t wait to try these. Also, guess I could make the “rings” with tin foil…?
Pam,
Use a skillet with a lid on the stove top with aluminum rings, taped with masking tape (on the outside of the rings).
Enjoy!
Carla
thx, ignore the other msg… didn’t think my other one posted, computer acting oddly today. ;)
Pam,
No problem! All comments are moderated, which means I read and then approve them when I get a chance.
I heard you can remove the top and bottom of tuna cans and use them as rings.
Laurie,
Thanks for sharing!
I’ve read the same thing, but all the tuna cans I buy with flip-off lids have rounded bottoms where you cannot remove the bottoms with a can opener. However, I bet they’d work with the bottom on.
Carla
I was going to use tuna cans too, until I checked them in my recycling and saw they had rounded bottoms! Nice for stacking, sigh… :)
Facebook Comment:
” I made them, a Crunch in every bite. DDDDDDDDDDDDDDDlicious.”
~ D.F.